之前遇到需要看变量的值,或者循环次数等每次都用println()来打印log,但是这样每次调试完还得一个个删除,若忘了删除够段时间再次调试时候一堆log淹没真正需要的信息。记得刚去学长所在公司时候他介绍过lldb,不过因为当时还基本不懂开发,也没在意。如今在简书上看到这篇久违的的LLDB篇一,让lldb提升你的效率 和LLdb篇2教你使用faceBook的chisel来提高调试效率 决定好好一下lldb的使用,从此告别没完没了的println()。
lldb入门 打印log 打印log是最常用的调试方法,但是目前所用的println()方式有着诸多不便。如果编译前忘了加上去的话,那么加上pritnln后还得重新编译重启app。调试完毕还得删掉相关语句。不能很灵活变动。
1
2
3
4
5
var a = 10 for i in 0 ... 3 { println(a) a += 2 }
若要在上面这段函数中使用lldb则按照一下步骤
1.注释掉原有的println(),
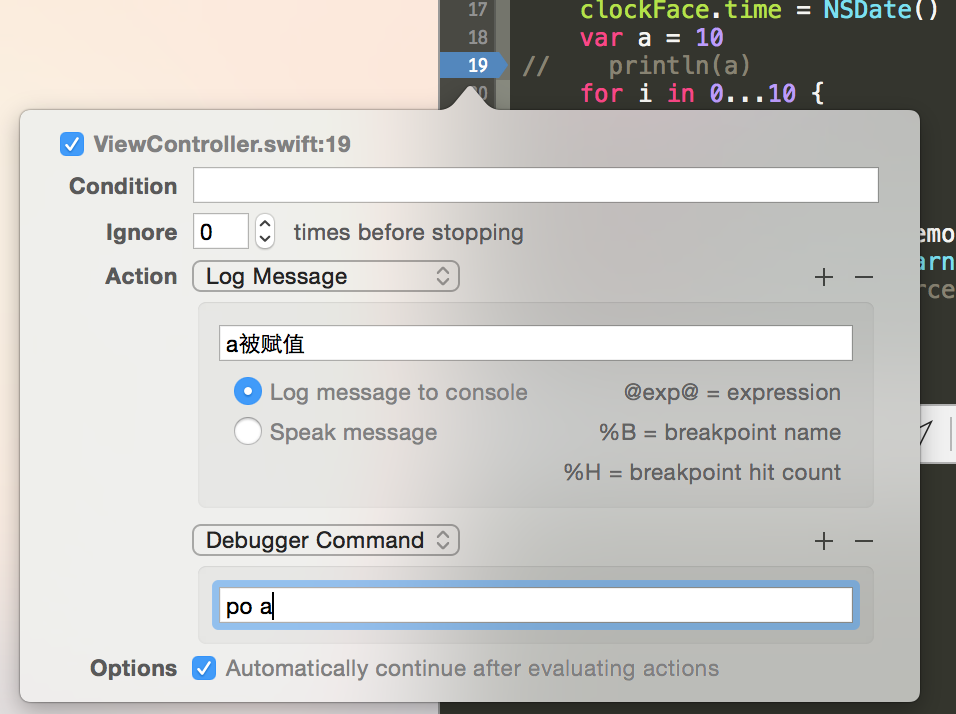
2.在需要打印log的地方增加一个断点(breakpoint)。
3.断点上右键单击编辑断点,添加一个Log Massage “a被赋值”。
4.增加一个Debugger Command po a。
5.增加一个Debugger Command p a。
6.勾选automaticlly continue after evalating value,这样程序不会中断继续执行。
1
2
3
4
5
6
7
8
9
10
11
a 被赋值10 a 被赋值12 a 被赋值14 a 被赋值16
print相关lldb命令如下
print可以用来打印变量的值 如 print resultCount
print可以使用简写prin, pri, p
po命令可以打印对象的description方法的结果
其他lldb基本命令 expression
expression 可以改变一个值,例如expression s
expression可以使用e来代替
1
2
3
4
5
6
7
8
(lldb) po a 22 (lldb) e a = 10 (lldb) po a 10 (lldb)
流程控制
continue会取消暂停,继续执行下去到达下一个断电,LLDB中使用process continue,别名continue,或者使用缩写c
step over会执行当前这个函数,然后继续。LLDB中使用thread step-over,next或者缩写n
step into指跳进一个函数调试。LLDB中使用thread step in,step或者s
step out会继续执行到下一个返回语句,然后再次停止
thread return会在当前断点处直接返回出函数,函数剩余部分不会被执行。LLDB中使用thread return NO
断点管理
breakpoint list可以看到所有断点,简写br li
breakpoint set可以创建断点,缩写br
lldb进阶 - chisel
chisel是一个加强LLDB调试能力的小插件。主要特点在于辅助界面开发调试时在控制台以尽可能直观的方式查看界面的元素和情况。为我们梳理视图,控制器以及类关系层级。
安装chisel chisel 的安装非常简单,只需要brew install chisel即可安装。安装成功后有如下提示。
1
2
3
4
==> Caveats Add the following line to ~/.lldbinit to load chisel when Xcode launches: command script import /usr/ local/opt/ chisel/libexec/ fblldb.py ==> Summary
这时需要向~/.lldbinit文件(不存在则需要新建)中添加如下命令。注:路径要以自己电脑现实的为准
1 command script import /usr/ local/opt/ chisel/libexec/ fblldb.py
然后重启xCode。lldb中输入help,若可以看到一下的user-defined commands则表示配置成功。
1
2
3
4
5
6
7
8
9
Current user-defined commands: alamborder -- For more information run 'help alamborder' alamunborder -- For more information run 'help alamunborder' binside -- For more information run 'help binside' bmessage -- For more information run 'help bmessage' border -- For more information run 'help border' caflush -- For more information run 'help caflush' .. . .. .
基本命令 用chisel命令不需要专门添加断电,需要时候直接暂停即可。
pviews pviews可以打印出view的层级关系,如下
1
2
3
4
5
6
7
8
9
10
(lldb) pviews < UIWindow : 0x7ffd6141b590 ; frame = (0 0 ; 320 568 ); gestureRecognizers = < NSArray : 0x7ffd61410530 > ; layer = < UIWindowLayer : 0x7ffd61417390 >> | < UIView : 0x7ffd6159f680 ; frame = (0 0 ; 320 568 ); autoresize = W + H ; layer = < CALayer : 0x7ffd6159b3e0 >> | | < UIView : 0x7ffd6159f790 ; frame = (75 362 ; 123 96 ); autoresize = RM + BM ; layer = < CALayer : 0x7ffd6159b450 >> | | < test.ClockFaceView : 0x7ffd6159c480 ; frame = (75 103 ; 200 200 ); autoresize = RM + BM ; layer = < CALayer : 0x7ffd6159b7b0 >> | | | < _TtCC4test13ClockFaceView14ClockFaceLayer: 0x7ffd6159b490 > (layer) | | | | < CAShapeLayer : 0x7ffd6159cd50 > (layer) | | | | < CAShapeLayer : 0x7ffd6159da70 > (layer) | | < _UILayoutGuide: 0x7ffd6159fb40 ; frame = (0 0 ; 0 20 ); hidden = YES ; layer = < CALayer : 0x7ffd6159feb0 >> | | < _UILayoutGuide: 0x7ffd615a05b0 ; frame = (0 568 ; 0 0 ); hidden = YES ; layer = < CALayer : 0x7ffd615a06e0 >>
show/hide 可以显示和隐藏某个view
1 2 (lldb) hide 0x7ffd6159f680 (lldb) show 0x7ffd6159f680
border/unborder 可以为某个view增加和取消边框,方便定位
1
2
(lldb) border 0x79ec3140 - c green - w 2 (lldb) unborder
pinternals 打印出来的一个控件(id)类型的内部结构,非常详细。
1
2
3
4
5
6
7
8
9
10
11
12
13
14
15
16
17
18
19
20
21
22
23
24
25
26
27
28
29
30
pinternals 0x7ff1ab5a6770 (UIView) $14 = { UIResponder = { NSObject = { isa = UIView } } _layer = 0x00007ff1ab5a10a0 _gestureInfo = nil _gestureRecognizers = nil _subviewCache = 0x00007ff1ab51af30 @"0 objects" _charge = 0 _tag = 0 _viewDelegate = nil _backgroundColorSystemColorName = nil _countOfMotionEffectsInSubtree = 0 _countOfTraitChangeRespondersInDirectSubtree = 0 _retainCount = 2 _tintAdjustmentDimmingCount = 0 _shouldArchiveUIAppearanceTags = false _interactionTintColor = nil _minXVariable = 0x00007ff1ab5c6de0 _minYVariable = 0x00007ff1ab5c3050 _boundsWidthVariable = 0x00007ff1ab5c2dd0 _boundsHeightVariable = 0x00007ff1ab5c3070 _layoutEngine = 0x00007ff1ab5c2b60 _layoutDebuggingIdentifier = nil _internalConstraints = 0x00007ff1ab51af30 @"0 objects" _constraintsExceptingSubviewAutoresizingConstraints = 0x00007ff1ab5c3d30 @"0 objects" __presentationControllerToNotifyOnLayoutSubviews = 0x0006000000000000
presponder 打印出一个集成于UIResponder控件的消息传递链。
1
2
3
4
5
6
7
(lldb) presponder 0x7ff1ab5a6770 <UIView: 0x7ff1ab5a6770; frame = (75 362; 123 96); autoresize = RM+BM; layer = <CALayer: 0x7ff1ab5a10a0> > | <UIView: 0x7ff1ab5a6660; frame = (0 0; 320 568); autoresize = W+H; layer = <CALayer: 0x7ff1ab5a23c0>> | | <test.ViewController: 0x7ff1ab6380a0> | | | <UIWindow: 0x7ff1ab411de0; frame = (0 0; 320 568); gestureRecognizers = <NSArray: 0x7ff1ab409a20>; layer = <UIWindowLayer: 0x7ff1ab417a90>> | | | | <UIApplication: 0x7ff1ab528330> | | | | | <test.AppDelegate: 0x7ff1ab40f050>
待续
