文本分类是自然语言处理核心任务之一,常见用文本审核、广告过滤、情感分析、语音控制和反黄识别等NLP领域。本文介绍如何建模和调优技巧。
安装依赖 使用一下命令安装 Kashgari 2,安装 Kashgari 2 的时候自动安装 TensorFlow。
1 pip install 'kashgari>=2.0.0'
TensorFlow 2.1 开始不再区分 CPU 和 GPU 版本,如果本地已经配置好了显卡驱动和 CUDA,那么将会自动使用 GPU 训练。
训练基线模型 训练基线(BaseLine)模型是一个常见做法,具体来说一开始使用最简单常用的架构和方法训练一个模型作为一个基线,然后在这个具体的基线上面不断调优的过程。
前文-基于 Kashgari 2 的短文本分类: 数据分析和预处理 已经准备好了数据集,我们使用数据集进行训练。
1 2 3 4 5 6 7 8 9 10 11 12 13 14 15 16 17 18 19 from kashgari.tasks.classification import BiLSTM_Modelbase_model = BiLSTM_Model() base_history = base_model.fit(train_x, train_y, valid_x, valid_y, batch_size=128 , epochs=10 ) base_report = base_model.evaluate(test_x, test_y)
训练 10 个轮次后,模型可以再训练集达到接近 0.95 的准确度,但在评估集和测试集上只能达到 0.85 和 0.835 左右。说明模型的泛华能力有待提高,在没有见过的数据上的表现不够好。
可视化 Loss 和 Accuracy 曲线 我们使用 matplotlib 来可视化训练和评估的 Loss 和 Accuracy 曲线。base_history 对象,该对象有个属性叫 history。所以我们打印 base_history.history 可以看到以下结构的数据。
1
2
3
4
5
6
{ 'loss' : [0.3494057357311249 , 0.16317875683307648 , ...], 'accuracy' : [0.9003000259399414 , 0.9518399834632874 , ...], 'val_loss' : [0.19090703129768372 , 0.13591724634170532 , ...], 'val_accuracy' : [0.9463000297546387 , 0.961899995803833 , ...] }
可视化代码如下
1 2 3 4 5 6 7 8 9 10 11 12 13 14 15 16 17 18 19 20 21 22 23 24 25 26 27 %matplotlib inline from typing import Dict , List import matplotlib.pyplot as pltimport numpy as npdef visualize_train_history (history_data: Dict [str , List [float ]] ): plt.figure(figsize=(14 , 4 ), dpi=200 ) plt.subplot(1 , 2 , 1 ) plt.plot(history_data['accuracy' ], label='accuracy' , linewidth=1.0 ) plt.plot(history_data['val_accuracy' ], label='val_accuracy' , linewidth=1.0 ) plt.title('Accuracy' ) plt.legend() plt.subplot(1 , 2 , 2 ) plt.plot(history_data['loss' ], label='loss' , linewidth=1.0 ) plt.plot(history_data['val_loss' ], label='val_loss' , linewidth=1.0 ) plt.title('Loss' ) plt.legend() plt.show() visualize_train_history(base_history.history)
使用预训练词向量 使用预训练词向量是一个常见的提高模型泛化能力的方案。预训练的词向量已经有了一定的语言模型知识,记录了词和词的关系,所以在此基础上训练的模型能够一定程度提高泛华能力(通常2-5%)。
Shen Li, Zhe Zhao 等研究者在 Github 开源了一份大型中文预训练词向量模型,提供使用不同表征(稀疏和密集)、上下文特征(单词、n-gram、字符等)以及语料库训练的中文词向量(嵌入)。由于我们的场景是新闻标题,所以我选择了比较接近的搜狗新闻语料基础上的词向量。读者也可以尝试用别的词向量。
下载 Word2vec / Skip-Gram - Sogou News 搜狗新闻 - Word 词向量到项目目录下,解压保存为 sgns.sogou.word。
1
2
3
4
5
6
7
8
9
10
11
12
13
14
15
16
from kashgari.embeddings import WordEmbeddingembed = WordEmbedding('sgns.sogou.word' ) embed_model = BiLSTM_Model(embed) embed_history = embed_model.fit(train_x, train_y, valid_x, valid_y, batch_size=128 , epochs=10 ) embed_report = embed_model.evaluate(test_x, test_y)
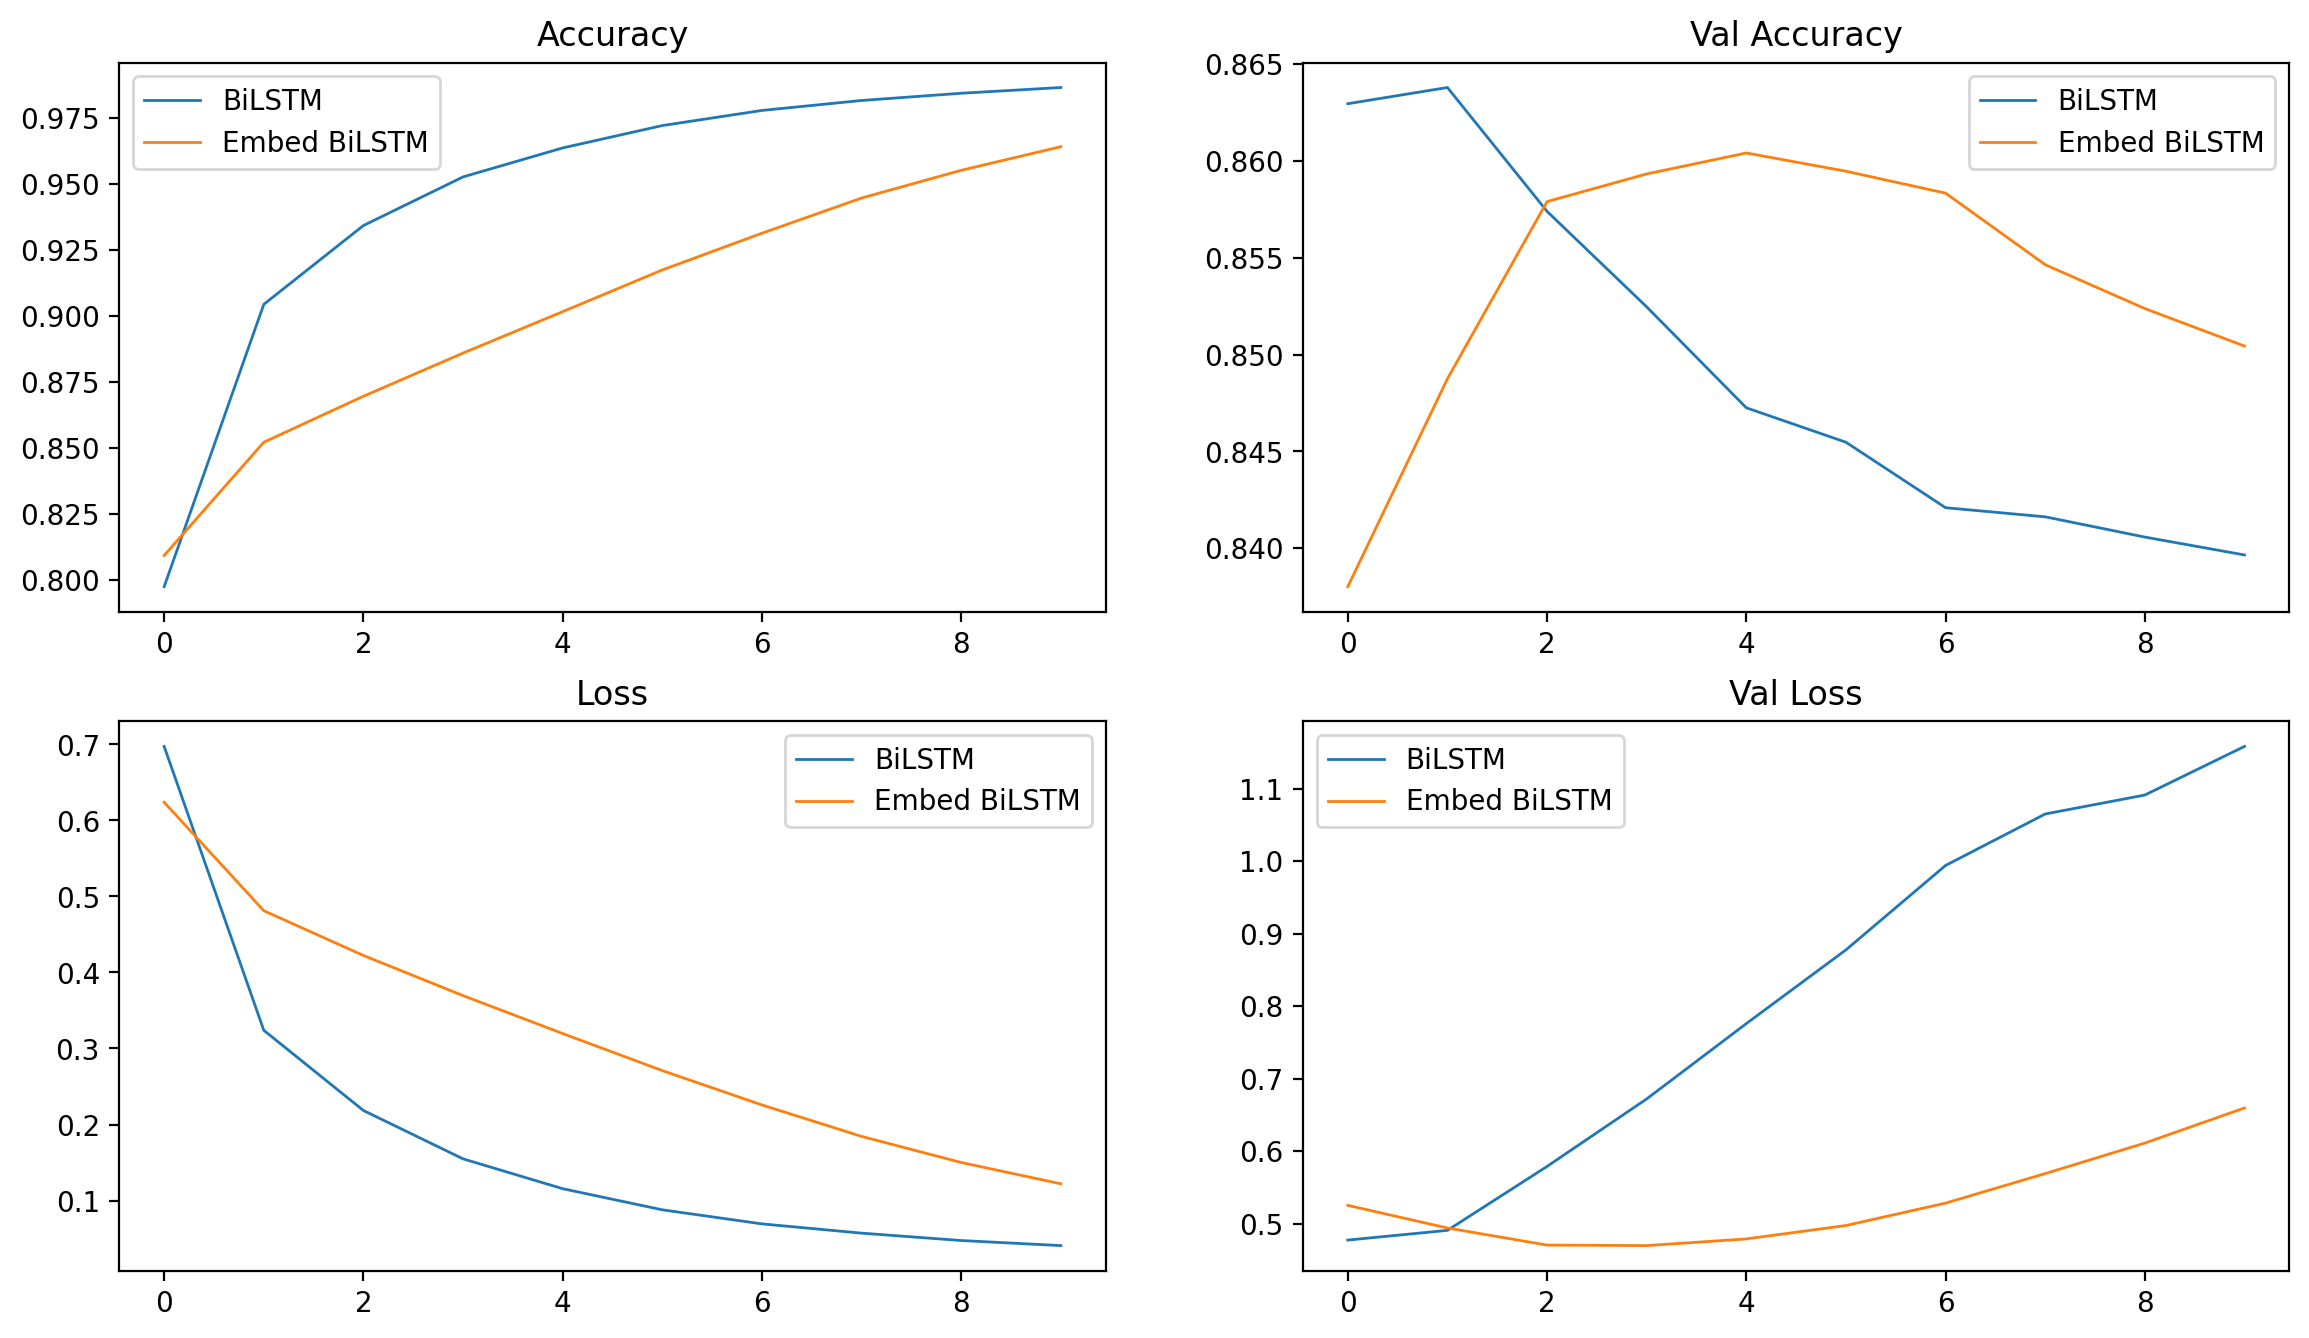
可以看到使用预训练词向量模型后,测试集提高到了 0.85, 比之前提高了 0.15 左右。
我们改造一下之前的可视化函数,使其能够比较多个模型的训练过程。
1
2
3
4
5
6
7
8
9
10
11
12
13
14
15
16
17
18
19
20
21
22
23
24
25
26
27
28
29
30
31
32
33
34
35
def visualize_multi_train_history (history_dict: Dict [str , Dict [str , List [float ]]] ): plt.figure(figsize=(14 , 8 ), dpi=200 , facecolor='white' ) plt.subplot(2 , 2 , 1 ) for model_name, data in history_dict.items(): plt.plot(data['accuracy' ], label=model_name, linewidth=1.0 ) plt.title('Accuracy' ) plt.legend() plt.subplot(2 , 2 , 2 ) for model_name, data in history_dict.items(): plt.plot(data['val_accuracy' ], label=model_name, linewidth=1.0 ) plt.title('Val Accuracy' ) plt.legend() plt.subplot(2 , 2 , 3 ) for model_name, data in history_dict.items(): plt.plot(data['loss' ], label=model_name, linewidth=1.0 ) plt.title('Loss' ) plt.legend() plt.subplot(2 , 2 , 4 ) for model_name, data in history_dict.items(): plt.plot(data['val_loss' ], label=model_name, linewidth=1.0 ) plt.title('Val Loss' ) plt.legend() plt.show() visualize_multi_train_history(history_dict={ 'BiLSTM' : base_history.history, 'Embed BiLSTM' : embed_history.history })
自定义模型 除了使用 Kashgari 内置的模型以外,我们还可以自定义模型结构进行训练。我们只需要定义模型分层和超参数,其他的前后处理和训练步 Kashgari 已经处理好了。
比如我们自定义一个双层双向 LSTM + DropOut 层的模型,定义代码如下:
1
2
3
4
5
6
7
8
9
10
11
12
13
14
15
16
17
18
19
20
21
22
23
24
25
26
27
28
29
30
31
32
33
34
35
36
37
38
39
40
41
42
43
44
45
46
47
48
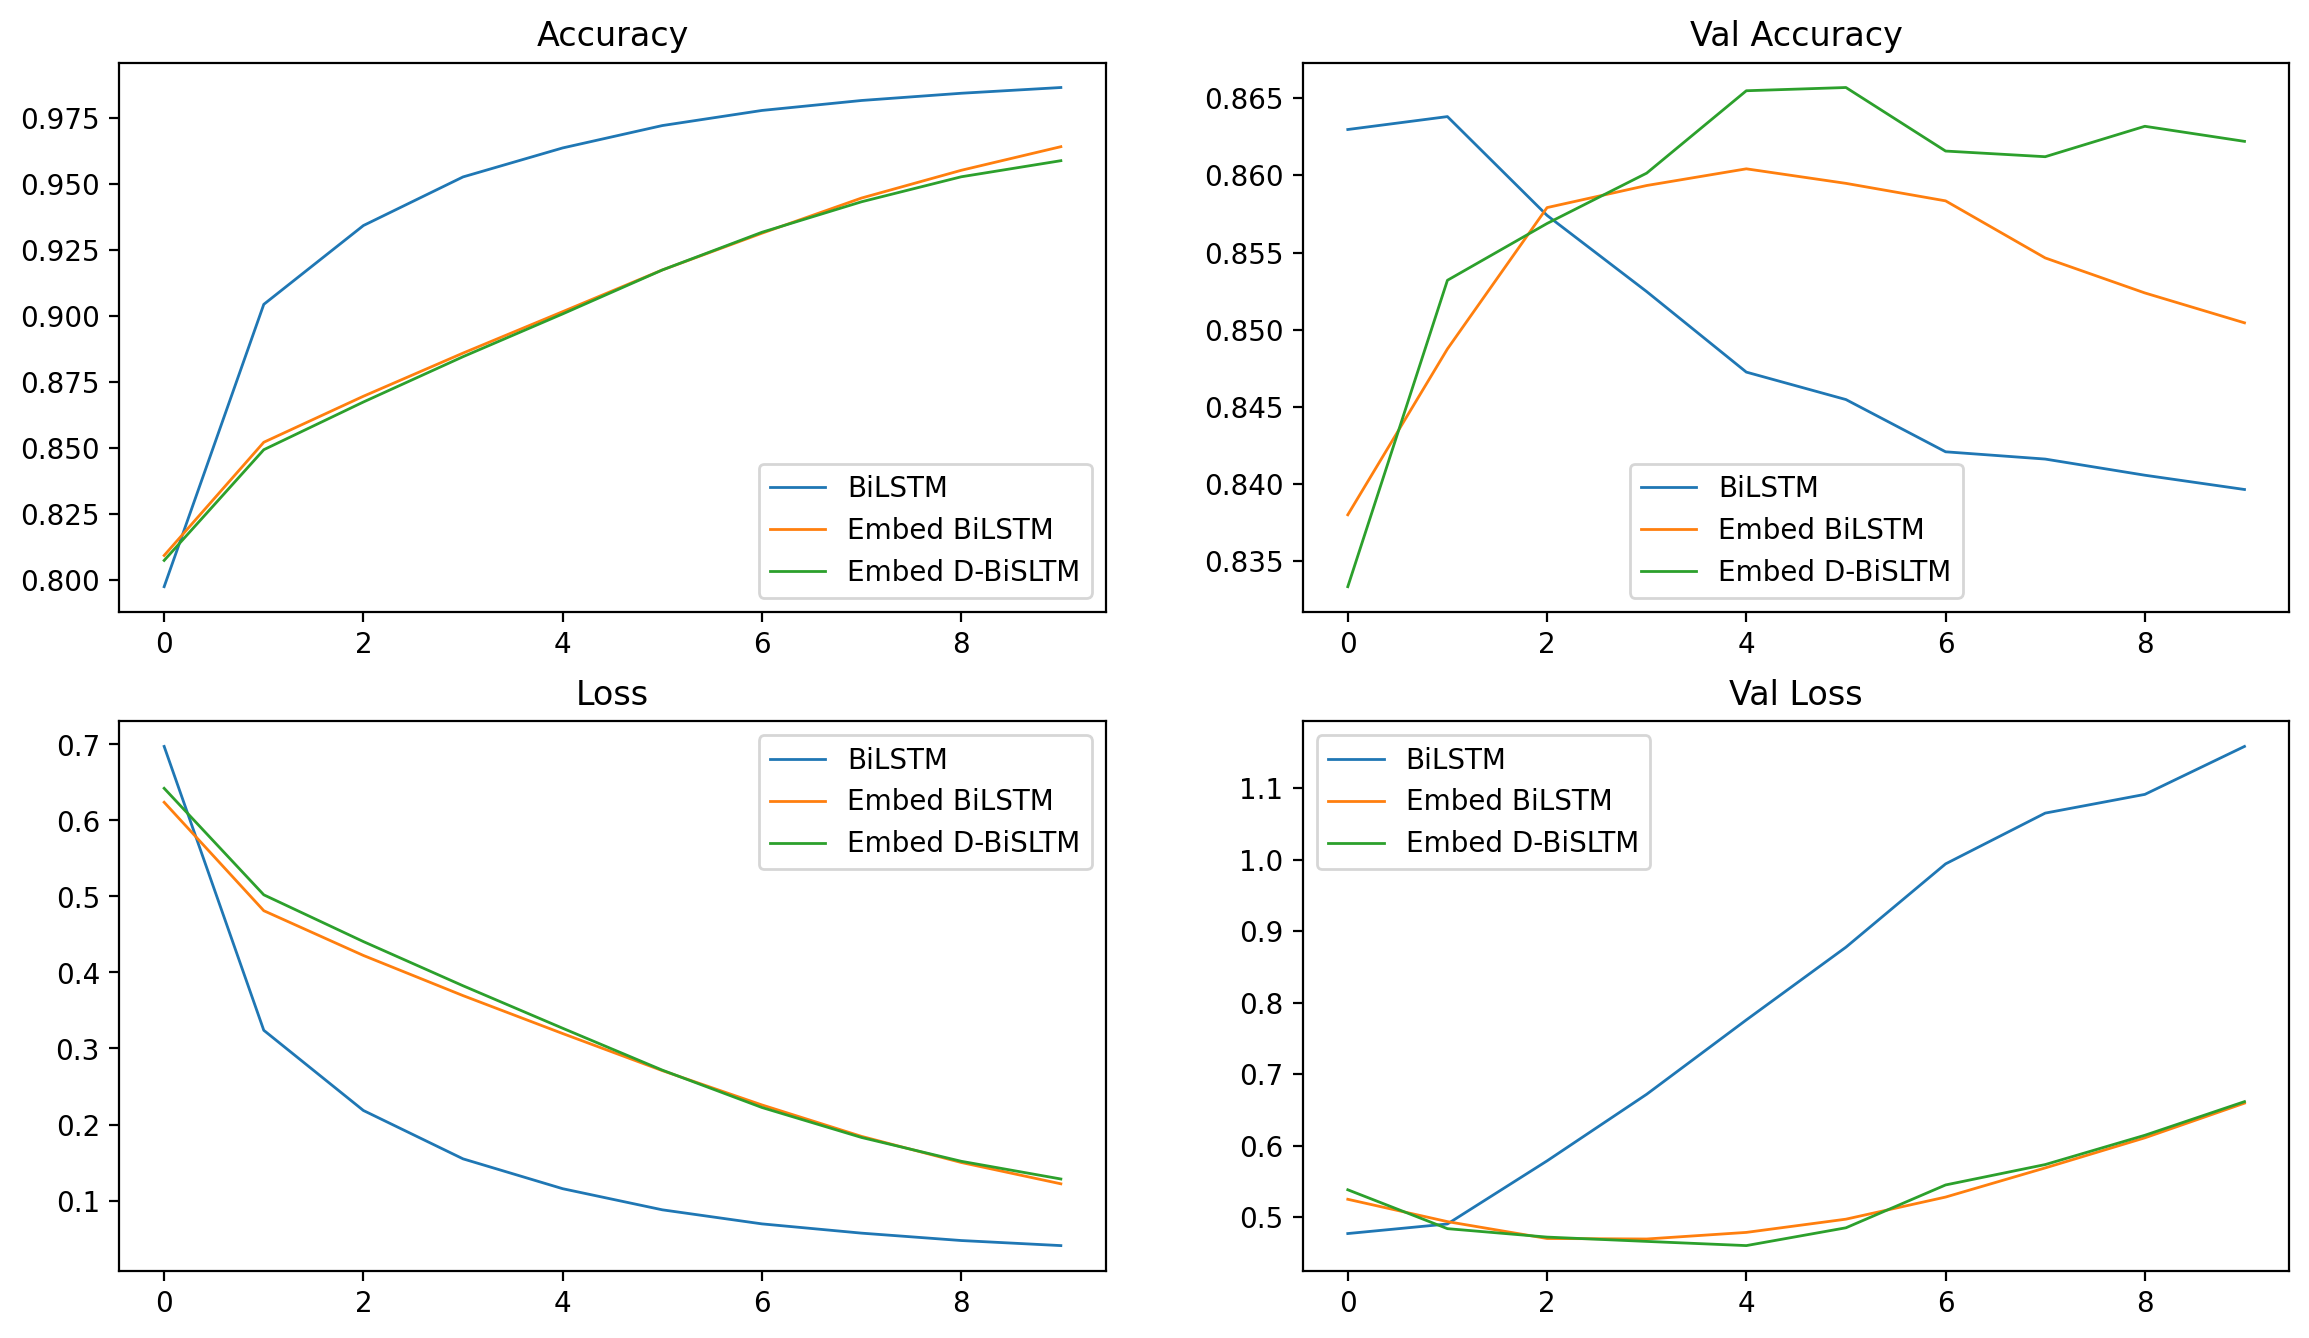
from typing import Dict , Any from tensorflow import kerasfrom kashgari.layers import Lfrom kashgari.tasks.classification.abc_model import ABCClassificationModelclass Double_BiLSTM_Model (ABCClassificationModel ): @classmethod def default_hyper_parameters (cls ) -> Dict [str , Any ]: return { 'lstm1_units' : 256 , 'lstm2_units' : 128 , 'dropout_rate' : 0.5 } def build_model_arc (self ) -> None : config = self.hyper_parameters output_dim = self.label_processor.vocab_size embed_model = self.embedding.embed_model self.tf_model = keras.Sequential([ embed_model, L.Bidirectional(L.LSTM(config['lstm1_units' ], return_sequences=True )), L.Bidirectional(L.LSTM(config['lstm2_units' ], return_sequences=False )), L.Dropout(config['dropout_rate' ]), L.Dense(output_dim), self._activation_layer() ]) double_model = Double_BiLSTM_Model(embed) double_history = double_model.fit(train_x, train_y, valid_x, valid_y, batch_size=128 , epochs=10 ) double_report = double_model.evaluate(test_x, test_y)
使用自定义模型架构后测试集准确度提高到了 0.866,我们再次可视化训练过程指标,可以看到下图。
保存模型 训练完成后,我们调用 save 方法保存模型即可。
1 double_model.save('best_model' )
模型将会保存到 best_model 目录下,目录结构如下:
1
2
3
4
best_model ├── embed_model_weights.h5 ├── model_config.json └── model_weights.h5
总结 我们上文提到的方法以外,读者可以尝试以下几个方法优化模型准确度。
使用其他 Kashgari 内置的模型。
自定义新的模型架构。
使用其他的 Embedding 模型。
使用新的一组超参训练模型。


