学习笔记 - 分析BRYXBanner的实现

今天微博上看到一款非常棒的可以带图片显示的下拉通知条及示例 - BRYXBanner,封装良好,调用方便。在此之前自己封装比这个简单多的Loading通知View,但每次调用非常麻烦,代码风格也不是很好。看了源码整个Class就200多行代码,而且使用swift编写。所以决定挨个分析其函数,语法及风格来学习类此模块的封装。
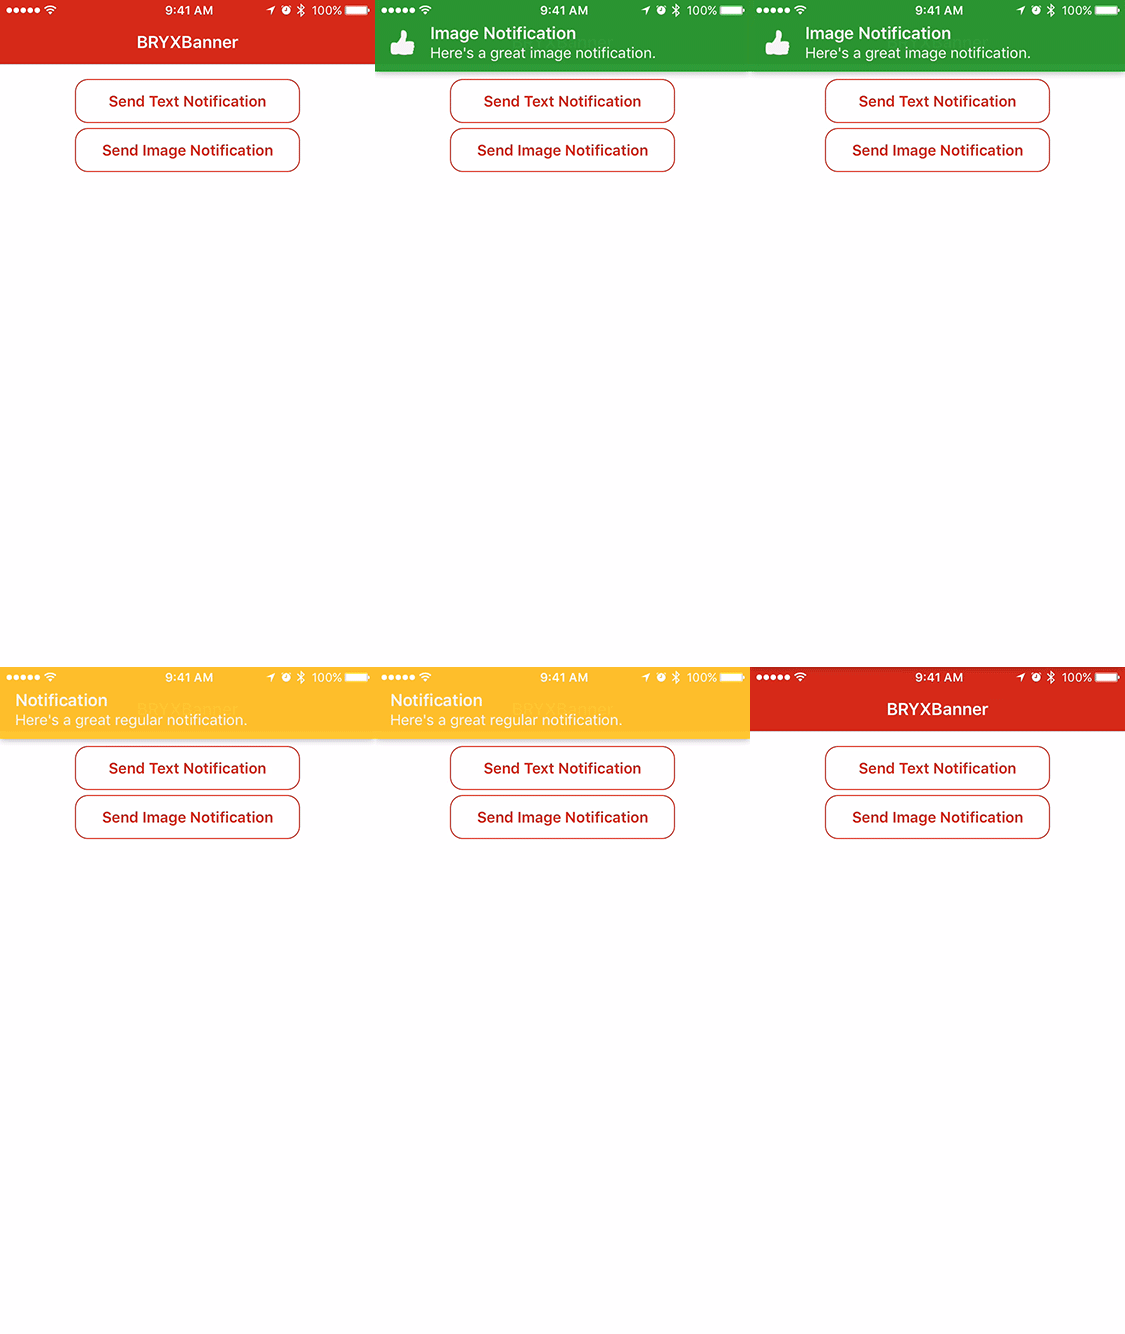
BRYXBanner Demo

声明枚举

1
2
3
4
5
6
7
8
9
10
11
12
13
14
15
16
private enum BannerState {
case Showing, Hidden, Gone
}

/// A level of 'springiness' for Banners.

public enum BannerSpringiness {
case None, Slight, Heavy
private var springValues: (damping: CGFloat, velocity: CGFloat) {
switch self {
case .None: return (damping: 1.0, velocity: 1.0)
case .Slight: return (damping: 0.7, velocity: 1.5)
case .Heavy: return (damping: 0.6, velocity: 2.0)
}
}
}

第一个枚举BannerState的声明没什么好说的,最基本的枚举声明方式 - 枚举语法。声明了Banner的四中状态。
第二个枚举声明有点意思,使用了类型属性语法方式,将damping和velocity的组合springValues与BannerSpringiness的三中状态绑定。方便调用和统一修改。其引用方法为

1
2
3
4
var a = BannerSpringiness.None
let (damping, velocity) = a.springValues
println(damping)
println(velocity)

声明Banner类

1
2
3
4
/// Banner is a dropdown notification view that presents above the main view controller, but below the status bar.
public class Banner: UIView {
//
}

声明Banner为UIView,也没有什么特殊的地方,后续内容均为Banner类内的方法和变量。

待解决

1
2
3
4
5
6
private class func topWindow() -> UIWindow? {
for window in (UIApplication.sharedApplication().windows as! [UIWindow]).reverse() {
if window.windowLevel == UIWindowLevelNormal && !window.hidden { return window }
}
return nil
}

声明私有变量

1
2
3
4
5
6
7
8
9
10
11
12
13
14
15
16
17
18
19
20
21
22
private let contentView = UIView()
private let labelView = UIView()
private let backgroundView = UIView()

/// How long the slide down animation should last.
public var animationDuration: NSTimeInterval = 0.4

public var springiness = BannerSpringiness.Slight

/// The color of the text as well as the image tint color if `shouldTintImage` is `true`.
public var textColor = UIColor.whiteColor() {
didSet {
resetTintColor()
}
}

/// Whether or not the banner should show a shadow when presented.
public var hasShadows = true {
didSet {
resetShadows()
}
}

前面是一些基本的私有变量和公共变量的声明,最后两个textColorhasShadows的声明包含了一个didSet属性观察器

属性观察器监控和响应属性值的变化,每次属性被设置值的时候都会调用属性观察器,甚至新的值和现在的值相同的时候也不例外。

虽然这个概念很早就了解到了,但还真的一直未用过。之前相同场景我都是先赋值,然后再引用相关函数。原来用didSet可以很方便的更新标题,配色等属性。
相关案例

1
2
3
4
5
6
7
8
9
10
11
12
13
14
15
16
17
18
19
20
21
22
class StepCounter {
var totalSteps: Int = 0 {
willSet(newTotalSteps) {
print("About to set totalSteps to \(newTotalSteps)")
}
didSet {
if totalSteps > oldValue {
print("Added \(totalSteps - oldValue) steps")
}
}
}
}
let stepCounter = StepCounter()
stepCounter.totalSteps = 200
// About to set totalSteps to 200
// Added 200 steps
stepCounter.totalSteps = 360
// About to set totalSteps to 360
// Added 160 steps
stepCounter.totalSteps = 896
// About to set totalSteps to 896
// Added 536 steps

属性计算

1
2
3
4
5
6
7
8
9
10
11
/// The color of the background view. Defaults to `nil`.
override public var backgroundColor: UIColor? {
get { return backgroundView.backgroundColor }
set { backgroundView.backgroundColor = newValue }
}

/// The opacity of the background view. Defaults to 0.95.
override public var alpha: CGFloat {
get { return backgroundView.alpha }
set { backgroundView.alpha = newValue }
}

除存储属性外,类、结构体和枚举可以定义计算属性。计算属性不直接存储值,而是提供一个 getter 和一个可选的 setter,来间接获取和设置其他属性或变量的值。
如果计算属性的 setter 没有定义表示新值的参数名,则可以使用默认名称newValue。
只有 getter 没有 setter 的计算属性就是只读计算属性。只读计算属性总是返回一个值,可以通过点运算符访问,但不能设置新的值。只读计算属性的声明可以去掉get关键字和花括号:

getter和setter例子

1
2
3
4
5
6
7
8
9
10
11
12
13
14
15
16
17
18
19
var x:Int!

var xTimesTwo:Int{
get {
return x * 2
}
set {
x = newValue / 2
}
}

x = 10 //给x一个初始值

println(xTimesTwo) //xTimesTwo get xTimesTwo = 2 * x = 20

xTimesTwo = 10 //xTimesTwo set 执行 x = newValue / 2
println(x) // x = 5
println(xTimesTwo) // xTimesTwo get xTimesTwo = 2 * x = 10

声明闭包

1
2
3
4
5
6
7
8
9
10
11
12
13
14
15
16
17
18
/// A block to call when the uer taps on the banner.
public var didTapBlock: (() -> ())?

/// A block to call after the banner has finished dismissing and is off screen.
public var didDismissBlock: (() -> ())?

/// Whether or not the banner should dismiss itself when the user taps. Defaults to `true`.
public var dismissesOnTap = true

/// Whether or not the banner should dismiss itself when the user swipes up. Defaults to `true`.
public var dismissesOnSwipe = true

/// Whether or not the banner should tint the associated image to the provided `textColor`. Defaults to `true`.
public var shouldTintImage = true {
didSet {
resetTintColor()
}
}

前两个为处理点击事件和消失后引用的闭包。没什么特殊的。更多相关知识 - 闭包

初始化界面元素

1
2
3
4
5
6
7
8
9
10
11
12
13
14
15
16
17
18
19
20
21
22
23
24
25
26
27
28
29
30
31
32
33
34
35
36
/// The label that displays the banner's title.
public let titleLabel: UILabel = {
let label = UILabel()
label.font = UIFont.preferredFontForTextStyle(UIFontTextStyleHeadline)
label.numberOfLines = 0
label.setTranslatesAutoresizingMaskIntoConstraints(false)
return label
}()

/// The label that displays the banner's subtitle.
public let detailLabel: UILabel = {
let label = UILabel()
label.font = UIFont.preferredFontForTextStyle(UIFontTextStyleSubheadline)
label.numberOfLines = 0
label.setTranslatesAutoresizingMaskIntoConstraints(false)
return label
}()

/// The image on the left of the banner.
let image: UIImage?

/// The image view that displays the `image`.
public let imageView: UIImageView = {
let imageView = UIImageView()
imageView.setTranslatesAutoresizingMaskIntoConstraints(false)
imageView.contentMode = .ScaleAspectFit
return imageView
}()

private var bannerState = BannerState.Hidden {
didSet {
if bannerState != oldValue {
forceUpdates()
}
}
}

看这些代码真是涨姿势,原来还可以用闭包来创建并初始化界面元素。这个代码整体风格非常棒,结构简介明了。以后我得认真模仿这种代码风格。

初始化 - init

1
2
3
4
5
6
7
8
9
10
11
12
13
14
15
16
17
18
19
20
21
  /// A Banner with the provided `title`, `subtitle`, and optional `image`, ready to be presented with `show()`.
///
/// :param: title The title of the banner. Optional. Defaults to nil.
/// :param: subtitle The subtitle of the banner. Optional. Defaults to nil.
/// :param: image The image on the left of the banner. Optional. Defaults to nil.
/// :param: backgroundColor The color of the banner's background view. Defaults to `UIColor.blackColor()`.
/// :param: didTapBlock An action to be called when the user taps on the banner. Optional. Defaults to `nil`.

public required init(title: String? = nil, subtitle: String? = nil, image: UIImage? = nil, backgroundColor: UIColor = UIColor.blackColor(), didTapBlock: (() -> ())? = nil) {
self.didTapBlock = didTapBlock
self.image = image
super.init(frame: CGRectZero)
resetShadows()
addGestureRecognizers()
initializeSubviews()
resetTintColor()
titleLabel.text = title
detailLabel.text = subtitle
backgroundView.backgroundColor = backgroundColor
backgroundView.alpha = 0.95
}

这个初始化及备注说明写的非常优雅,title, subtitle, image 这三个可以根据需要设为nil。初始化过程中除了基本的几个变量赋值外,其余的均函数调用。现在挨个分析这些函数。

super.init(frame: CGRectZero)疑问?

重置(设置)阴影 - resetShadows()

1
2
3
4
5
6
private func resetShadows() {
layer.shadowColor = UIColor.blackColor().CGColor
layer.shadowOpacity = self.hasShadows ? 0.5 : 0.0
layer.shadowOffset = CGSize(width: 0, height: 0)
layer.shadowRadius = 4
}

这个方法在初始化时候及hasShadows值变化时候被调用,主要用来设置阴影。其中需要关注的是这一行

1
layer.shadowOpacity = self.hasShadows ? 0.5 : 0.0

这是一种判断条件的缩写方式,我也最近才学到。用法如下

1
2
3
4
5
6
7
8
9
var condition = true //判断条件
var result = condition ? 1 : 0 //这一行效果与下面if判断一致

if condition {
result = 1
} else {
result = 0
}

添加手势动作 - addGestureRecognizers()

1
2
3
4
5
6
private func addGestureRecognizers() {
addGestureRecognizer(UITapGestureRecognizer(target: self, action: "didTap:"))
let swipe = UISwipeGestureRecognizer(target: self, action: "didSwipe:")
swipe.direction = .Up
addGestureRecognizer(swipe)
}

这里增加了两个手势动作,分别是点击事件didTap和往上滑动事件didSwipe

子视图初始化 - initializeSubviews()

下面这个是大头,采取在代码上备注的方式记录

1
2
3
4
5
6
7
8
9
10
11
12
13
14
15
16
17
18
19
20
21
22
23
24
25
26
27
28
29
30
31
32
33
34
35
36
37
38
39
40
41
42
43
44
45
46
47
48
49
50
51
52
53
54
55
56
57
private func initializeSubviews() {
//设置View字典
let views = [
"backgroundView": backgroundView,
"contentView": contentView,
"imageView": imageView,
"labelView": labelView,
"titleLabel": titleLabel,
"detailLabel": detailLabel
]
//禁止自动设置Autolayout约束
setTranslatesAutoresizingMaskIntoConstraints(false)
addSubview(backgroundView)
backgroundView.setTranslatesAutoresizingMaskIntoConstraints(false)

//添加约束
addConstraints(NSLayoutConstraint.constraintsWithVisualFormat("H:|[backgroundView]|", options: .DirectionLeadingToTrailing, metrics: nil, views: views))
addConstraints(NSLayoutConstraint.constraintsWithVisualFormat("V:|[backgroundView(>=80)]|", options: .DirectionLeadingToTrailing, metrics: nil, views: views))

backgroundView.backgroundColor = backgroundColor
contentView.setTranslatesAutoresizingMaskIntoConstraints(false)
backgroundView.addSubview(contentView)
labelView.setTranslatesAutoresizingMaskIntoConstraints(false)
contentView.addSubview(labelView)
labelView.addSubview(titleLabel)
labelView.addSubview(detailLabel)

//读取状态栏大小
let statusBarSize = UIApplication.sharedApplication().statusBarFrame.size
//设置偏移位置,以便Banner不压住状态栏
let heightOffset = min(statusBarSize.height, statusBarSize.width) // Arbitrary, but looks nice.
for format in ["H:|[contentView]|", "V:|-(\(heightOffset))-[contentView]|"] {
backgroundView.addConstraints(NSLayoutConstraint.constraintsWithVisualFormat(format, options: .DirectionLeadingToTrailing, metrics: nil, views: views))
}
let leftConstraintText: String
//若有image,则添加进来,病适当调整其他元素
if let image = image {
contentView.addSubview(imageView)
contentView.addConstraints(NSLayoutConstraint.constraintsWithVisualFormat("H:|-(15)-[imageView]", options: .DirectionLeadingToTrailing, metrics: nil, views: views))
contentView.addConstraint(NSLayoutConstraint(item: imageView, attribute: .CenterY, relatedBy: .Equal, toItem: contentView, attribute: .CenterY, multiplier: 1.0, constant: 0.0))
imageView.addConstraint(NSLayoutConstraint(item: imageView, attribute: .Width, relatedBy: .Equal, toItem: nil, attribute: .NotAnAttribute, multiplier: 1.0, constant: 25.0))
imageView.addConstraint(NSLayoutConstraint(item: imageView, attribute: .Height, relatedBy: .Equal, toItem: imageView, attribute: .Width, multiplier: 1.0, constant: 0.0))
leftConstraintText = "[imageView]"
} else {
leftConstraintText = "|"
}
let constraintFormat = "H:\(leftConstraintText)-(15)-[labelView]-(8)-|"
contentView.addConstraints(NSLayoutConstraint.constraintsWithVisualFormat(constraintFormat, options: .DirectionLeadingToTrailing, metrics: nil, views: views))
contentView.addConstraints(NSLayoutConstraint.constraintsWithVisualFormat("V:|-(>=1)-[labelView]-(>=1)-|", options: .DirectionLeadingToTrailing, metrics: nil, views: views))
backgroundView.addConstraints(NSLayoutConstraint.constraintsWithVisualFormat("H:|[contentView]-(<=1)-[labelView]", options: .AlignAllCenterY, metrics: nil, views: views))

for view in [titleLabel, detailLabel] {
let constraintFormat = "H:|-(15)-[label]-(8)-|"
contentView.addConstraints(NSLayoutConstraint.constraintsWithVisualFormat(constraintFormat, options: .DirectionLeadingToTrailing, metrics: nil, views: ["label": view]))
}
labelView.addConstraints(NSLayoutConstraint.constraintsWithVisualFormat("V:|-(10)-[titleLabel][detailLabel]-(10)-|", options: .DirectionLeadingToTrailing, metrics: nil, views: views))
}

刚开始看着一段感觉好长一坨,肯定有很多很神奇的东西。认真看了一遍发现基本都是View的约束,只是Autolayout用起来比较操蛋而已。充分体现了Masonry等第三方Autolayout扩展的重要性。

重写didMoveToSuperview方法

1
2
3
4
5
6
7
8
9
10
11
12
13
14
private var showingConstraint: NSLayoutConstraint?
private var hiddenConstraint: NSLayoutConstraint?
private var commonConstraints = [NSLayoutConstraint]()

override public func didMoveToSuperview() {
super.didMoveToSuperview()
if let superview = superview where bannerState != .Gone {
commonConstraints = NSLayoutConstraint.constraintsWithVisualFormat("H:|[banner]|", options: .DirectionLeadingToTrailing, metrics: nil, views: ["banner": self]) as! [NSLayoutConstraint]
superview.addConstraints(commonConstraints)
let yOffset: CGFloat = -7.0 // Offset the bottom constraint to make room for the shadow to animate off screen.
showingConstraint = NSLayoutConstraint(item: self, attribute: .Top, relatedBy: .Equal, toItem: window, attribute: .Top, multiplier: 1.0, constant: yOffset)
hiddenConstraint = NSLayoutConstraint(item: self, attribute: .Bottom, relatedBy: .Equal, toItem: window, attribute: .Top, multiplier: 1.0, constant: yOffset)
}
}

上述函数就是定义了三个NSLayoutConstraint,作为内部属性。根据显示状态改变。

显示函数 - show()

1
2
3
4
5
6
7
8
9
10
11
12
13
14
15
16
public func show(duration: NSTimeInterval? = nil) {
if let window = Banner.topWindow() {
window.addSubview(self)
forceUpdates()
let (damping, velocity) = self.springiness.springValues
UIView.animateWithDuration(animationDuration, delay: 0.0, usingSpringWithDamping: damping, initialSpringVelocity: velocity, options: .AllowUserInteraction, animations: {
self.bannerState = .Showing
}, completion: { finished in
if let duration = duration {
dispatch_after(dispatch_time(DISPATCH_TIME_NOW, Int64(duration * NSTimeInterval(NSEC_PER_SEC))), dispatch_get_main_queue(), self.dismiss)
}
})
} else {
println("[Banner]: Could not find window. Aborting.")
}
}

Banner的显示函数,可选参数duration表示显示时间。若duration未设置,则需要手动隐藏Banner。
其中要点之一,通过let window = Banner.topWindow()获取当前需要显示的window,其中具体的实现topWindow()不是很明白,周一请教一下同事。
将Banner添加(addSubview)到目标视图后,调用forceUpdates()函数设置约束。
其中UIViewAnimation巧妙的利用最初声明的枚举来取适当的值,很好的做法。需要参考。
如果设置了duration则利用延时函数dispatch_after来设定消失时间,病调用dismiss方法。

消失函数 - dismiss()

1
2
3
4
5
6
7
8
9
10
public func dismiss() {
let (damping, velocity) = self.springiness.springValues
UIView.animateWithDuration(animationDuration, delay: 0.0, usingSpringWithDamping: damping, initialSpringVelocity: velocity, options: .AllowUserInteraction, animations: {
self.bannerState = .Hidden
}, completion: { finished in
self.bannerState = .Gone
self.removeFromSuperview()
self.didDismissBlock?()
})
}

消失函数跟显示函数一样,实质上只负责更新bannerState这个枚举变量的值,当枚举变量bannerState值发生变化时,通过属性观察器didSet来调用界面更新函数forceUpdates()。很方便且直观的做法,今后采取。

界面更新函数 - forceUpdates()

1
2
3
4
5
6
7
8
9
10
11
12
13
14
15
16
17
18
19
20
private func forceUpdates() {
if let superview = superview, showingConstraint = showingConstraint, hiddenConstraint = hiddenConstraint {
switch bannerState {
case .Hidden:
superview.removeConstraint(showingConstraint)
superview.addConstraint(hiddenConstraint)
case .Showing:
superview.removeConstraint(hiddenConstraint)
superview.addConstraint(showingConstraint)
case .Gone:
superview.removeConstraint(hiddenConstraint)
superview.removeConstraint(showingConstraint)
superview.removeConstraints(commonConstraints)
}
setNeedsLayout()
setNeedsUpdateConstraints()
layoutIfNeeded()
updateConstraintsIfNeeded()
}
}

这个函数可取之处也不少。

  1. if let函数可以带多个参数,同时满足所有条件情况下才运行。
  2. 显示隐藏等动作,可以把具体的约束赋值给变量,然后通过addConstraintremoveConstraint方式更新约束。

目前还有几点小疑问没能解决。后天请教同事后补充上。分析好的代码真是的好的学习方法。其中很多做法从来没想到过。真实涨姿势,以后有空就多看看别人怎么实现具体的功能的~